Sidebar
firstexample:first_example_microzed
Hello World on the Avnet MicroZed Board
This example will demonstrate how to use the deep compiler to translate a simple Java program and run it on a MicroZed board. This is a simple Hello World example. It does not allow to use the FPGA part of the zynq7000. See Application Development or System Developer for that purpose.
- Start eclipse, choose a new workspace and open the deep perspective with Window → Open Perspective → Other → Deep.
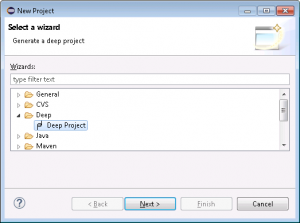
- Create a new deep project with File → New → select Project…, Deep → select Deep Project.
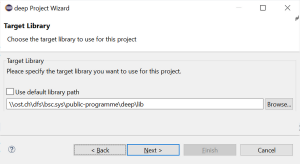
- On the Target Library wizard page you have to choose where the deep target runtime library is located. You can use the default library path or uncheck the box and browse to the location where you've installed the library. You can always set the default library path in deep Perspective and deep Preferences. Click Next.
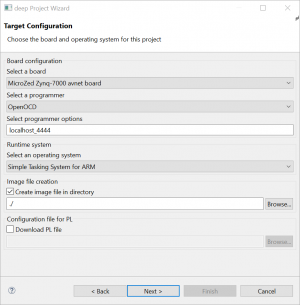
- Target Configuration:
- Select a board: MicroZed Zynq-7000 avnet board
- Select a operating System: Simple Tasking System for ARM
- Select a programmer: OpenOCD
- Select programmer options: localhost_4444
- Select the checkbox Create image file and choose the location to save the image file. Default save location is the project folder. You can use relative or absolute paths.
- Select the checkbox Download PL file and select a suitable configuration file if you are going to use the programmable logic part (FPGA) on the Zynq7000 processor. This is not necessary for the simple hello world program.
- Project name:
- Choose a project name (no spaces, no dashes, no special characters such as “umlauts”)
- Use default location or choose a location
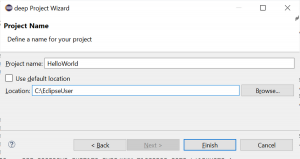
- Finish creates the project
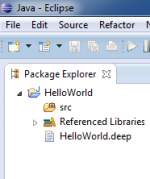
- The empty project will show on the left side in the package explorer.
- By right-clicking on the source folder (src) in the package explorer choose New → Package and add package name, e.g. test.
- By right-clicking on the newly created package choose New → Class and enter class name HelloWorld.
- Open class and enter source code:
import java.io.PrintStream;
import org.deepjava.runtime.zynq7000.driver.UART;

public class HelloWorld {
	static {
		// Initialize UART (115200 8N1)
		UART uart = UART.getInstance(UART.pUART1);
		uart.start(115200, UART.NO_PARITY, (short)8);

		// Use the uart for stdout
		System.out = new PrintStream(uart.out);

		// Print a string to the stdout
		System.out.println("Hello world");
	}
}
- Open deep project file HelloWorld.deep. This file can be found in the root of the project.
- Add the newly created class to rootclasses. It should then look like this:
#deep-1 meta { version = "Mon Jan 15 09:08:35 CET 2020"; description = "deep project file for HelloWorld"; } project HelloWorld { libpath = "//ost.ch/dfs/bsc.sys/public-programme/deep/lib"; boardtype = MicroZed; ostype = sts_arm; programmertype = openOCD; programmeropts = localhost_4444; imgfile = "./"; # pl_file = ""; # enter names of rootclasses, e.g. # rootclasses = "test.MyFirstTestClass","other.MySecondTestClass"; rootclasses = "test.HelloWorld"; } - Plug a JTAG-HS3 adapter into J3 of your board and connect it with your host machine by an USB cable. This will create a USB Serial Converter device on your machine.
- We use OpenOCD for downloading and debugging programs. Make sure to have it installed, see Download and Installation. Next, set the deep preferences so that the OpenOCD command and command options suits your installation, please refer to Setting Deep Preferences and Starting OpenOCD.
- Make sure that you select the WinUSB driver for your JTAG-HS3 adapter https://wiki.ost.ch/display/EDS/Digilent+JTAG-HS3.
- Set the jumpers on your MicroZed board as follows
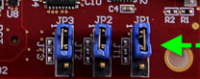 .
.
This will boot the device from JTAG. The settings of the jumpers will be read only at powerup! - Connect your host machine with another USB cable to the MicroZed board on connector J2. This applies power to the target and creates a USB to UART bridge device (COM port).
- Use a terminal program such as
puttyorrealtermto open the COM-port on J2 (baudrate = 115200). Select the appropriate COM port number. Check your host operating settings for this number. If there is no associated serial port yet - make sure, that you have the proper driver installed (Downloading CP210x drivers). - Create a new run configuration by marking the project file HelloWorld.deep. Then, right-click on it and choose Run As → Deep Application.
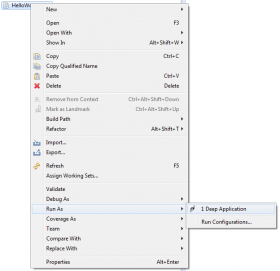
If you already created such a run configuration you can select it from the pulldown menu of the run-button.

- Run will compile, link and download the image file. Downloading automatically starts OpenOCD.
- The terminal window will show Hello world.
- With
 you can recompile and rerun the program.


firstexample/first_example_microzed.txt · Last modified: 2025/02/18 14:17 by ursgraf
Page Tools
Except where otherwise noted, content on this wiki is licensed under the following license: CC Attribution-Share Alike 4.0 International
