Sidebar
firstexample:first_example_mpc555
Hello World on the NTB mpc555 Board
This example will demonstrate how to use the deep compiler to translate a simple Java program and run it on a NTB mpc555 Headerboard.
- Start eclipse, choose a new workspace and open the deep perspective with Window → Open Perspective → Other → Deep.
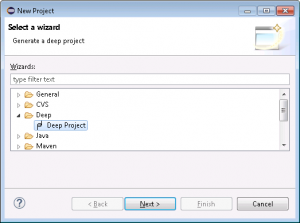
- Create a new deep project with File → New → select Project…, Deep → select Deep Project.
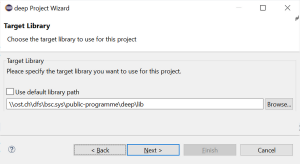
- On the Target Library wizard page you have to choose where the deep target runtime library is located. You can use the default library path or uncheck the box and browse to the location where you've installed the library. You can always set the default library path in deep Perspective and deep Preferences. Click Next.
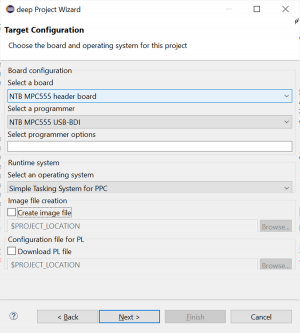
- Target Configuration:
- Select a board: NTB MPC555 header board
- Select a operating System: Simple Tasking System for PPC
- Select a programmer: NTB MPC555 USB-BDI
- If you like to have an image file, you can select the corresponding checkbox. This option is not necessary if you use the NTB MPC555 USB-BDI to download to the target.
- Project name:
- Choose a project name (no spaces, no dashes, no special characters such as “umlauts”)
- Use default location or choose a location
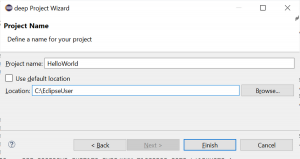
- Finish creates the project
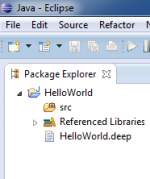
- The empty project will show on the left side in the package explorer.
- By right-clicking on the source folder (src) in the package explorer choose New → Package and add package name, e.g. test.
- By right-clicking on the newly created package choose New → Class and enter class name HelloWorld.
- Open class and enter source code:
import java.io.PrintStream;
import org.deepjava.runtime.mpc555.driver.SCI;

public class HelloWorld {
	static {
		// 1) Initialize SCI1 (9600 8N1)
		SCI sci1 = SCI.getInstance(SCI.pSCI1);
		sci1.start(9600, SCI.NO_PARITY, (short)8);

		// 2) Use SCI1 for stdout
		System.out = new PrintStream(sci1.out);

		// 3) Say hello to the world
		System.out.println("Hello world");
	}
}
- Open deep project file HelloWorld.deep. This file can be found in the root of the project.
- Add the newly created class to rootclasses. It should then look like this:
#deep-1 meta { version = "Mon Jan 15 15:42:10 CET 2020"; description = "deep project file for HelloWorld"; } project HelloWorld { libpath = "\\ost.ch\dfs\bsc.sys\public-programme\deep\lib"; boardtype = ntbMpc555HB; ostype = sts_ppc; programmertype = ntbMpc555UsbBdi; # programmeropts = ; # imgfile = "C:\EclipseUser\HelloWorld\HelloWorld"; # pl_file = none; # enter names of rootclasses, e.g. # rootclasses = "test.MyFirstTestClass","other.MySecondTestClass"; rootclasses = "test.HelloWorld"; } - Connect the hardware to your host PC by an USB cable and apply power to the target. You must have the necessary hardware libraries installed as described in Download and Installation.
- Open a terminal program such as
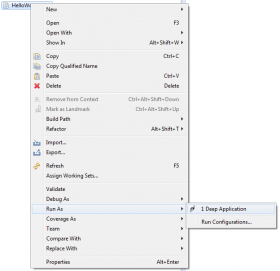
puttyorrealterm. Alternatively open a terminal program as an eclipse view. Select the appropriate serial port number. Check your host operating settings for this number. - Create a new run configuration by marking the project file HelloWorld.deep. Then, right-click on it and choose Run As → Deep Application.
If you already created such a run configuration you can select from the pulldown menu of the run-button.

- Run will compile, link and download the program.
- The terminal window will show Hello world.
- With
 you can recompile and rerun the programm.
 - See Flashing your Program (mpc555) for how to write your program to permanent flash memory.


firstexample/first_example_mpc555.txt · Last modified: 2022/12/20 10:26 by ursgraf
Page Tools
Except where otherwise noted, content on this wiki is licensed under the following license: CC Attribution-Share Alike 4.0 International
