Sidebar
firstexample:boot_loader
Boot Loader
Your MicroZed boards need a valid boot loader if you want to start it from the QSPI flash.
Check for Valid Boot Loader
- Set the jumpers on your MicroZed board as follows
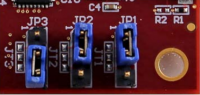 .
.
This will boot the device from the QSPI flash. - Cycle the power. The settings of the jumpers will be read only at power-on! Hence, make sure to cycle the supply power after changing the jumper settings. A soft reset (through the JTAG or by pressing the reset button on the board will reset the board but will not sample the boot mode pins connected to the jumpers.
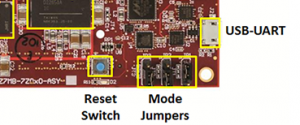
- Use a terminal program to open the COM port on the USB_UART (J2, Baudrate
115200). - Press reset
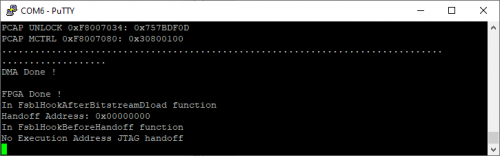
 This will reboot the device and cause the boot loader to run again
 - Check if the blue
doneled lights up. This signals that the boot loader successfully loaded the FPGA. - Check the output of the terminal program. It should show the following output
- If one of the two checks fails you have to flash a new bootloader, see below.


Flashing a new Boot Loader
- Set the jumpers on your MicroZed board as follows
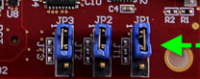 .
.
This will boot the device from JTAG. - Cycle the power. The settings of the jumpers will be read only at power-on! Hence, make sure to cycle the supply power after changing the jumper settings. A soft reset (through the JTAG or by pressing the reset button on the board will reset the board but will not sample the boot mode pins connected to the jumpers.
- Switch the driver for your JTAG-HS3 adapter to FTDI CDM, see https://wiki.ost.ch/display/EDS/Digilent+JTAG-HS3. IMPORTANT: You must close OpenOCD before switching the driver, else the WinUSB cannot be unloaded.
- The program to download can be found in the binaries of Vivado or Xilinx Vitis. You have to either install Vivado or Vitis which doesn't require a license. As Vivado uses lots of disk space we strongly recommend to install Vitis. For the installation see Installing Xilinx SDK. After installation, open a command shell and run the command (Change the command so that the right configuration file is loaded, see https://wiki.ost.ch/display/EDS/MicroZed+Boardhttps://wiki.ost.ch/display/EDS/MicroZed+Board). The corresponding files can be found in your target runtime library in the directory /rsc. Please make sure that the paths in the following command does not include spaces!
cmd /C C:\Xilinx\Vitis\2020.2\bin\program_flash -f \\ost.ch\dfs\bsc.sys\public-programme\deep\lib\rsc\BOOTflink2.mcs -offset 0 -flash_type qspi-x4-single -fsbl \\ost.ch\dfs\bsc.sys\public-programme\deep\lib\rsc\FSBL.elf -cable type xilinx_tcf url TCP:127.0.0.1:3121
Make sure that the programming was successful with the program printing
Flash Operation Successful
- Switch the driver for the JTAG-HS3 back to WinUSB, see https://wiki.ost.ch/display/EDS/Digilent+JTAG-HS3.

firstexample/boot_loader.txt · Last modified: 2025/02/18 13:02 by ursgraf
Page Tools
Except where otherwise noted, content on this wiki is licensed under the following license: CC Attribution-Share Alike 4.0 International
