Sidebar
installation
This is an old revision of the document!
Download
Requirements
- PC running Linux, Mac OS X or Windows
- Java Developer Kit 11 or newer
- Eclipse 3.8 or newer
- Microcontroller board (MPC555 / MPC5200B / MicroZed / Zybo / Colibri)
Install Eclipse
Windows
- Ensure that you've installed an up-to-date JDK.
- Download the JDK from the Oracle website.
- Install it by using the setup assistant
- Install Eclipse IDE for Java Developers.
- Get the newest version of Eclipse for Java Developers.
- Unzip it into
C:\Program Files\eclipseorC:\Programme\eclipse, respectively.
Linux
- Ensure that you have installed an up-to-date JDK.
- On ubuntu/debian based systems you can run
sudo apt install default-jdk
- Install Eclipse for Java Developers:
- Download it from here
- Extract it to a suitable place, such as
/opt/deep/eclipse/mkdir -p /opt/deep/eclipsetar -C /opt/deep/eclipse -xvf eclipse-java-2020-09-R-linux-gtk-x86_64.tar.gz
Install Eclipse Plugins
- Install the deep Eclipse plugin from our Update Site.
- Start the Eclipse IDE (eclipse.exe)
- Open the plugin installation dialog: Help → Install New Software…
- Add a new plugin source: Add… → Name: NTB Plugins, Location: http://update.deepjava.org/eclipse/ → OK
- Add the plugin by checking
deep Plugin for Eclipsefrom category „NTB“
Install deep Runtime Library
- Install the deep runtime library by extracting the ZIP archive from http://update.deepjava.org/runtime-library/deep_runtime_library_1.6.0_2020_09_15.zip to
C:\Programm Data\deep\trglib(Windows),/opt/deep/lib(Linux) or any other location.
Install Libraries to Access the Hardware
Using a Zynq7000 Based Board
If you use an ARM based target, i.e. the Zybo or MicroZed Board with a Zynq7000 processor, install the OpenOCD toolchain.
Windows
In order to use OpenOCD, the correct USB drivers must be installed. We suggest using USB driver tool for this purpose. This tool is available solely for Windows.
Installation of the USB driver
- Download the USB driver tool, extract and run it.
- Connect your FT2232 based programmer, e.g. the JTAG-HS3. If you use the Zybo board, connect the board directly as it has the programmer already packed on the board.
- Identify the USB serial converter, which connects to the JTAG bus. Depending on your actual board this will be
- Avnet MicroZed: Device name: Digilent USB Device, Vendor ID = 0403, Device ID = 6014
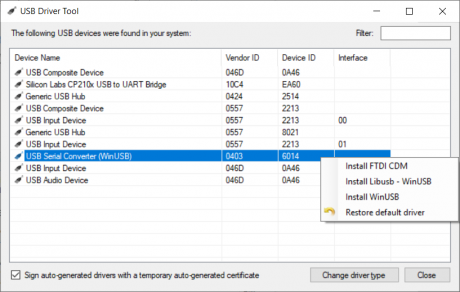
- Digilent Zybo: Device name: USB Serial Converter A, Vendor ID = 0403, Device ID = 6010, Interface = 00
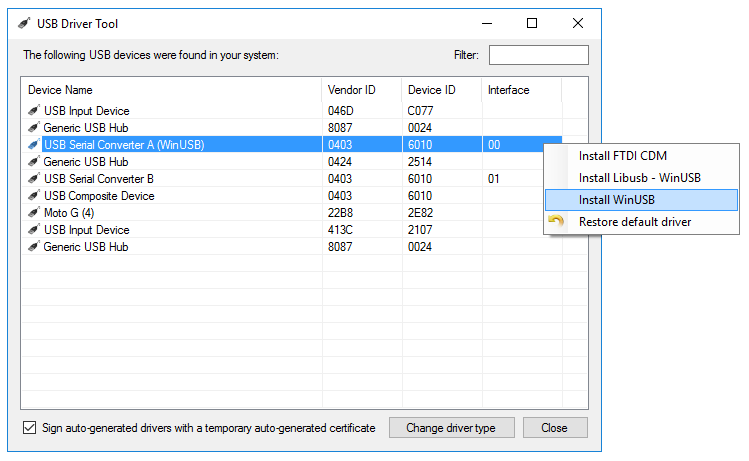
- Right-click on the device and select the WinUSB driver to install the driver
- If you want to reinstall the default driver choose “Restore default driver”


Installation of OpenOCD
- You can either compile OpenOCD from the source code or download the precompiled binaries for Windows, which is the preferred method
- Extract the archive to your computer
- The executable binary is located under:
openocd-0.10.0/bin-x64/ - The user manual is located under:
openocd-0.10.0/ - Get ostboards.rar and unpack it into your
openocd-0.10.0directory
Alternatively, you can download the precompiled binaries for Windows together with the necessary files for the MicroZed and the Zybo boards here
Installation of OpenOCD-Interface Plugin
The deep plugin of eclipse needs the openOCD plugin to access the hardware. Install it from our Update Site.
- Start the Eclipse IDE (eclipse.exe)
- Open the plugin installation dialog: Help → Install New Software…
- Add a new plugin source: Add… → Name: NTB Plugins, Location: http://update.deepjava.org/eclipse/ → OK
- Add the plugin by checking
openOCD Plugin for Eclipsefrom category „NTB“
Linux
- Install OpenOCD, it is probably available through your distribution's package manager. E.g.
sudo apt install openocd - Download ostboards.rar and unpack it to suitable place, such as
/opt/deep/openocd- Hint: You can use
7z(packagep7zip) to extract.rarfiles on linux:7z e ostboards.rar -o/opt/deep/openocd/
- Run OpenOCD with the correct config file:
cd /opt/deep/openocdsudo openocd -f microzedboard.cfgorsudo openocd -f digilent_zyboboard.cfg
Using a MPC555 Board
If you want to use deep with our MPC555 and the USB-BDI
- Install the LibusbJava. For Java 9 and later, make sure that you install the necessary plugin as follows:
- Start the Eclipse IDE (eclipse.exe)
- Open the plugin installation dialog: Help → Install New Software…
- Add a new plugin source: Add… → Name: NTB Plugins, Location: http://update.deepjava.org/eclipse/ → OK
- Add the plugin by checking
LibusbJava plugin for eclipsefrom category „NTB“
- Install the plugin
mpc555UsbBdifrom the same update site and follow the instructions of the plugin installer - On Windows, alternatively to step 1 and 2, you can use our NTB Windows Driver Package
Using a MPC5200 Board
When using a Abatron BDI2000/BDI3000 you must install the Abatron debugger plugin.
installation.1607512506.txt.gz · Last modified: 2020/12/09 12:15 by ursgraf
Page Tools
Except where otherwise noted, content on this wiki is licensed under the following license: CC Attribution-Share Alike 4.0 International
